I've had a few people ask my how I made the pillowcases from the earlier post. So, I've decided to share.
This is what you will need: an iron, pillowcase, fabric of your choice, and some double-sided iron-on adhesive. I got this from Joann's Fabric. It's $2.99 for 3 sheets which can go a pretty long way.
It's $2.99 for 3 sheets which can go a pretty long way.First, you'll need to find out which side of the Steam-a-Seam sheet has the netting on it. You can do this by peeling back a corner and feeling the inside. The rough side is the side with the netting. Then, on the netted side, draw the letters on the sheets of Steam-a-Seam backwards. If this is difficult, but you can always make it easy by tracing letters that you print out from your computer backwards.  Then, separate each letters by cutting the sheet (I cut the paper and then drew the letters, which is more difficult). Peel back the side of the sheet that you didn't draw on. Put the side that has the letter net-side down onto the back of your fabric. Then smooth the sheet onto the fabric so that they stick together. I used my license to smooth them together.
Then, separate each letters by cutting the sheet (I cut the paper and then drew the letters, which is more difficult). Peel back the side of the sheet that you didn't draw on. Put the side that has the letter net-side down onto the back of your fabric. Then smooth the sheet onto the fabric so that they stick together. I used my license to smooth them together.
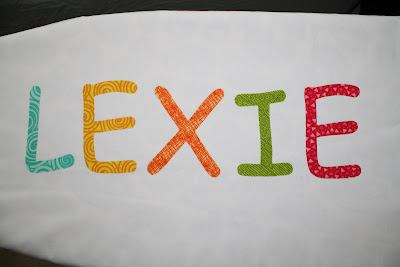
Next, cut out the letters on the fabric.

After cutting out all of the letters, peel the backing off of the adhesive sheets and arrange them on your pillowcase as you want them. Then, get to ironing. You need to iron each letter down for about 20 seconds. I iron them a little more to make sure that they stay put.

There you have it- a cute custom pillowcase!
What a great thing to share with us. Thanks!
ReplyDelete